Monday, April 18, 2011

Browned Butter Coconut Bread

coconut bread-bite

Or what I'm now calling The Best Quick Bread I've Ever Made.

I'm not kidding. This stuff is amazing. I'm already dreaming of variations. (I've attempted one, but it's not perfected yet. Once it is, you'll be the first to hear about it. Psst... it involves alcohol. Oh yeah.)

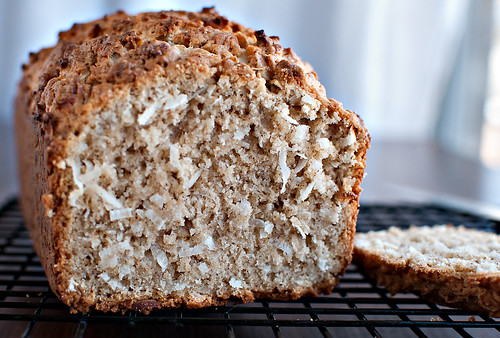
But let's get back to this bread first. This fragrant, sweet, flavorful, addictive bread. And this from a girl who claims not to like coconut. Well, not anymore folks.

coconut bread-crumb

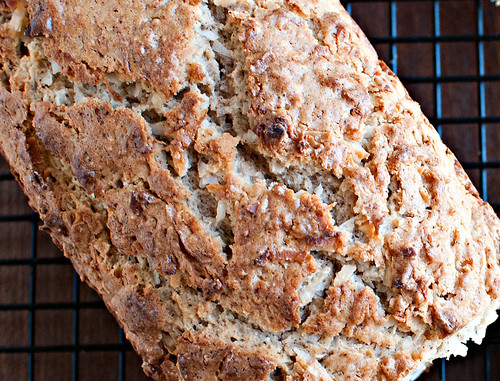
One of the best things about this bread — and really, everything about it is fantastic — is the crust. Oh, the crust. I think it's so amazing because of the mixing technique you'll see below. The crust is crunchy and full of vanilla buttery flavored goodness.

coconut bread-crust

The original recipe calls for melted butter. Since I was melting it anyway, I decided to take it a step further and make browned butter instead. If you've never browned butter before, don't worry. It's incredibly simple and transforms butter into something even more magical. The nutty aroma is one of my favorite baking smells. That and vanilla.

Speaking of vanilla, you'll need a vanilla bean for this recipe. I know, they're crazy expensive. Unless, like me, you get them from ebay. Yes, really. I talked about it here. They're probably not the best nor the freshest, but when I can get 1/4 pound for nearly the same price as 4 measly beans from the grocery store, I'm not going to complain!

Let's get to the recipe. ("FINALLY" I can hear you say.)

coconut bread

Browned Butter (and vanilla bean) Coconut Bread
Adapted from Seven Spoons


Ingredients
6 tablespoons unsalted butter, browned and cooled slightly (see notes below)
Seeds scraped from a vanilla bean (hang on to the pod!)

2 large eggs
1 1/4 cups COCONUT milk (I originally wrote this as just regular milk but completely spaced that I'd used coconut milk (canned) - sorry!)
2 teaspoons vanilla extract
2 1/2 cups flour, plus more for dusting the pan
2 teaspoons baking powder
2 teaspoons cinnamon
1/2 teaspoon salt
1 cup sugar
5 ounces flaked coconut* (about 1 1/2 cups)

*I used sweetened. My store didn't have unsweetened. I think you'll be fine using either.

To make browned butter:
Place butter in small sauce pan over medium-low heat. Melt, stirring periodically. Once it's melted, continue stirring. The butter will get foamy - keep stirring. Once the foam goes away, you'll notice that it's gotten very clear with some solids at the bottom. Keep stirring! You don't want those to burn. You want the butter to start to turn a very light brown color and you'll definitely start noticing the amazing, nutty aroma. Let the solids at the bottom turn light brown then remove from heat. Let cool about 5 minutes, then drop the cleaned out vanilla pot into the butter. Do this too soon and you'll have fried vanilla bean — trust me — so wait the 5 minutes. The hot butter will draw the rest of the vanilla goodness from the scraped bean. And, as an added bonus, your house will smell incredible. Best. Air freshener. Ever.
Let this cool about 15 minutes or so.

Directions
Preheat oven to 350°F.

Grease and flour a loaf pan.

In a small bowl, combine the eggs, milk, vanilla extract and scraped vanilla seeds (here's a great post from Zoe Francios at zoebakes about vanilla beans and how to use them).

In a large mixing bowl, whisk together the flour, baking powder, cinnamon, salt and sugar. Stir in the coconut with a wooden spoon. Add the egg mixture and stir JUST until combined. You can leave some flour dry because you add the browned butter next.

Remove vanilla bean from butter, then pour over batter. Gently fold in the butter, incorporating all of it but don't over mix - be gentle!
**Here's where I think the magic happens in this recipe. Adding the butter LAST means that it's basically coating the batter, hence the crunchy, flavor-filled crust. At least, that's my theory.**

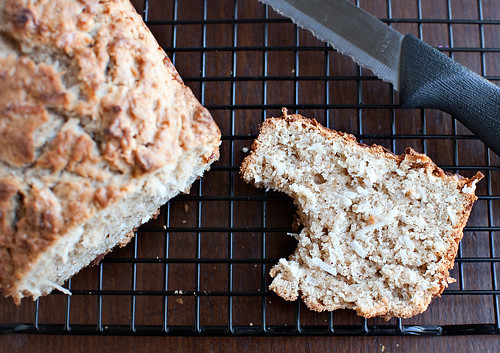
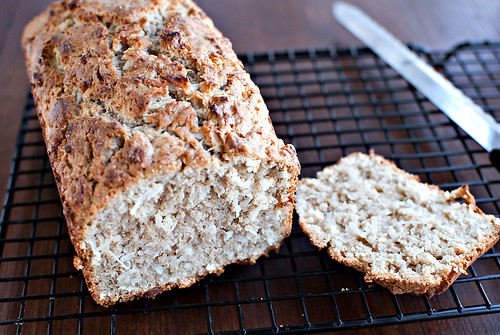
Scrape batter into prepared loaf pan and bake on the middle rack about 1 hour. The top will be golden brown (as you see in the photos) and a toothpick will come out clean.

Let the bread sit on a cooling rack in the pan about 10 minutes then turn out on to the rack. Let cool a bit more before slicing.

This is wonderful warm, but is equally fantastic at room temperature. It doesn't need a thing to make it any better, but I suppose you could spread some butter or jam over the top. I didn't bother. It was far too good all on its own to cover up with anything else.

Make this. Now!

Saturday, April 16, 2011

Garlic Soup and Walnut Bread

garlic soup-final

Social media is a funny thing. It is simultaneously a complete time suck–a veritable black hole of often meaningless chatter–and an infinite source of information and friendship. I often get gobbled up in the black hole, puttering around cyberspace, wasting time with things that honestly don't interest me. How does it DO that? But even more often, I get lost in new and interesting blogs and websites. I'm pointed in the direction of witty writers, brilliant photographers and talented artists. This is the bright spot of social media–the transfer of information and connecting with those that share our interests.

And, yeah, it's still a complete time suck...  but not necessarily a time waste. This is why I love twitter. Yes it's often full of random bits of chatter, but it's a wonderful resource for new information. I can't tell you how many new people, blogs and informative articles I've found via twitter.

It was shortly after I joined twitter that I also joined the Bread Baker's Apprentice Challenge. It was through both mediums that I connected with a number of talented bakers and all around nice people. Rebecca (@hobnob) and Daniel (@misterrios) are just two of these folks. And it was through some of that meaningless, idle chatter that the three of us decided to make the same garlic soup recipe and post to our respective blogs on the same day. Being the bread bakers that we are, we also decided to make walnut bread as it was mentioned in the soup recipe.

So here we are, the day of reckoning. Let's talk a little about the soup, okay? Daniel found this recipe at 101 Cookbooks. I won't write it out here because, as you will see, I was not entirely successful and I want you to get the recipe straight from the person that CAN make it successfully (read the comments - lots of people made this just fine, so don't let my experience turn you away from trying it).

The soup starts with garlic (NO, really??) Lots of garlic.

garlic-all peeled

But before it becomes these lovely naked cloves, we have to strip them out of their papery clothes. Here's how I do it, making quick, easy work of peeling garlic.

garlic

First pull off the requisite number of cloves. Place one clove under a bench scraper, the side of a broad knife or other wide, flat surface.

garlic smash prep

Strike the scraper with the palm of your hand (or press down hard),  but don't go nuts. The garlic doesn't need to be pummeled, just squished.

garlic-smashing

What this does is break the grip of the papery outside from the clove.

garlic-smashed1

garlic-peeling

The clove is then easily peeled, no fussing, no swearing at the STUPID PAPER THAT WON'T COME OFF, GAH! You know, that kind of thing.

Back to the soup. Here are the basic ingredients going into the first stage of the soup.

soup-ingredients

Chopped garlic, bay leaf, thyme, and sage. The recipe calls for sage leaves but I couldn't find any fresh or dried, so I had to used rubbed sage.

I don't have any pictures of the rest of the prep, but let me walk you through it. I combined the above ingredients (along with salt) with 4 cups of water and let it simmer about 40 minutes. The recipe doesn't say to cover the soup as it simmers, but I was afraid of half the water evaporating away so I covered mine. Next comes the tricky part – making the cheese/egg/oil emulsion to add to the broth to thicken the soup and make it nice and creamy.

That's the idea, anyway. My lack of experience with this technique resulted in a mildly curdled soup that tasted pretty good, but looked pretty bad. The texture was just wrong.

You can see it in the photos:
garlic soup-pour
garlic soup-final

Look at the spoon and the soup around it. You can see how it's separating. Such a disappointment. It looks like I need an extra set of hands to S L O W L Y add the broth to the egg/cheese mixture. It was difficult to keep a slow, steady stream while trying to whisk with the other hand. Practice makes perfect, right? So I guess I need to practice!

Now let's talk about the bread a bit. I had different issues with this part - it's always something isn't it?

I found this Apple-Walnut Bread recipe at King Arthur Flour. All I did was eliminate the apples. Their recipe is meant to be used as a fondue bread and I think it would be wonderful that way. I also think it would make for a fantastic panini if you shaped it into a boule or batard instead of small baguettes as I've done here.

You need to start the bread the day before since it utilizes a starter made of all-purpose flour, a bit of rye, some water and a tiny bit of yeast. It's about the consistency of pancake batter, you just mix it all with a spoon, cover it and let it sit out at least 12 hours or so. It'll get bubbly and have an almost beer-like smell. That tell-tale yeasty goodness.

You combine that with more flour, yeast and toasted, chopped walnuts, followed by a 60-90 minute fermentation. I used my baguette pan for shaping, but you can easily do these on a sheet pan lined with parchment paper.

walnut bread-shaped

As bad luck would have it, our power went out shortly after I took this picture. I wasn't too concerned since our power has never been out for very long. Weeellllll, it didn't come on until about 2 and a half hours later, a full hour longer than the bread needed to proof. I slashed the overproofed loaves — and sadly watched as they deflated like a popped balloon — spritzed them with water and popped them in the oven, hoping they weren't ruined.

walnut bread-baked

They won't win any awards base on appearance, but they taste wonderful. I love the walnuts scattered through the bread and the fact that, unlike other breads I've made with walnuts, this bread is not at all sweet. It's a crusty, hearty bread itching to soak up some garlic soup – properly prepared soup, that is. Maybe next time.

walnut bread in bowl


I can't wait to see how Rebecca and Daniel fared with their soups and breads. Please check out their blogs with me!

Rebecca at GrongarBlog
Daniel at Ährelich Gesagt
Related Posts Plugin for WordPress, Blogger...