Showing posts with label dessert. Show all posts

Sunday, July 29, 2012

Bourbon Date Blueberry Cinnamon Rolls

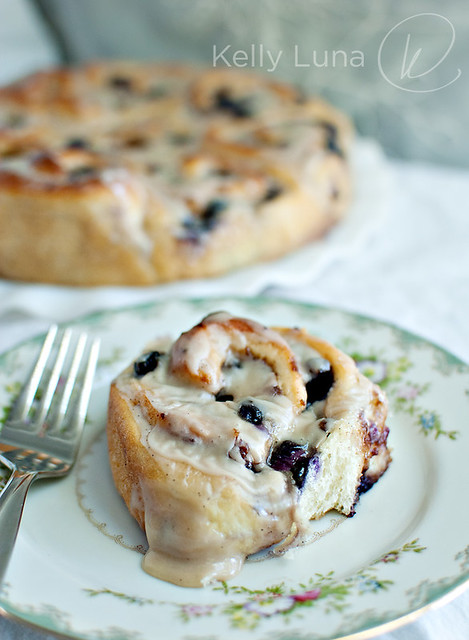
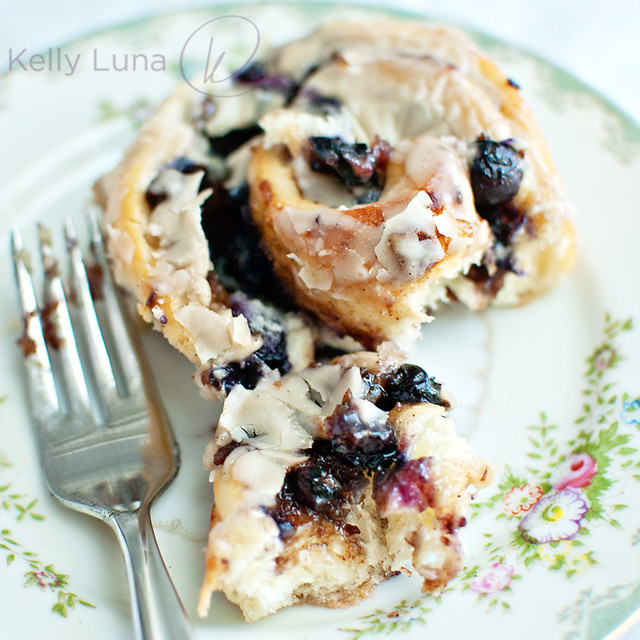
roll-plated

Inspired by the über-talented Barb over at Creative Culinary, I just *had* to make these rolls. You see, she tweeted about the bourbon date cinnamon rolls she was making and I couldn't get them out of my head. I knew I had the ingredients on hand, so when I got home, I immediately set to making them.

I'm not going to include a proper recipe in this post because I was seriously winging it, but I'll let you know what I did so you can give it a go. What I would suggest is going over to Barb's blog and check out her recipe. I'm sure it is phenomenal as everything I've made of hers — and there have been MANY – are keepers.

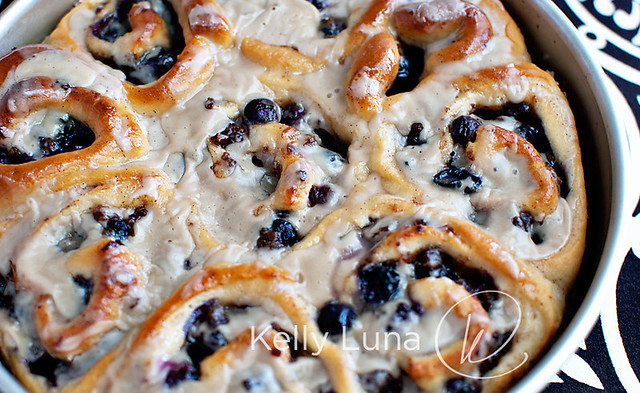
rolls in pan

I used Peter Reinhart's cinnamon roll recipe for the dough, with the exception of the egg. Oops. I completely spaced it when mixing the dough, hence the reason for a properly assembled mise en place!

I roughly chopped some dates and put them in a bowl, poured some bourbon over the top and let them soak while the dough was rising. When it was time to assemble the rolls, I ran the dates and bourbon through my food processor to create a lovely and fragrant paste. I added about 1/4 cup of sugar (could have used more, but the sugary icing made up for the lack) and 2 heaping teaspoons of cinnamon. Mixed that all together and spread it over the flattened dough. I then sprinkled about a cup and a half of fresh blueberries over that, rolled it up and cut them into rolls.

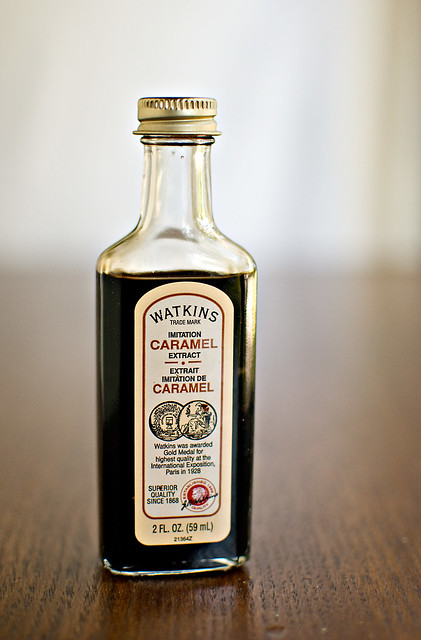
I decided to go with a simple powdered sugar and milk icing but added a half teaspoon of vanilla extract, seeds from one vanilla bean, and half a teaspoon of caramel extract. (I LOVE this stuff, and you might remember that I've used in around here before in these cookies, oh and these, too, among other things.)

caramel flavoring

I used at least a cup and a half (probably more like two) of powdered sugar, then just added enough milk to make it the correct consistency, and drizzled it over the tops of the rolls, being rather generous with my "dripping." Nothing wrong with that!

roll-plated-fork

The verdict: gooey, sweet, fresh rolls begging for a cup of coffee or a tall glass of milk.

Remember, you can get the recipe for Barb Kieble's amazing Date, Walnut and Bourbon Cinnamon Rolls (with cream cheese frosting - OH MY!) over at Creative Culinary.

Tuesday, August 3, 2010

Dangerously Decadent Cupcakes

ChPBCC-crumb2

I had to come up with a shorter name for these cupcakes because "Dark Chocolate Cupcakes with Dark Chocolate Reese's Peanut Butter Cup Center and Peanut Butter Frosting Dipped in Homemade Magic Shell" is technically correct but WAAAAY too long, don't you think?

Besides, Dangerously Decadent Cupcakes is also accurate given the various individual and combined components. I'm pretty sure these should come with a warning. Something like: These are so rich and delicious, you are advised to eat at your own risk; death by cupcake is not out of the realm of possibility.

Dwight and I were invited to a cookout last Saturday which gave me the perfect opportunity to test out a cupcake idea on some willing guinea pigs. I've found that most people don't really care that you're testing a recipe on them, especially if it involves cupcakes. And chocolate. And peanut butter. So I looked up some recipes, combined various ideas together and came up with these.
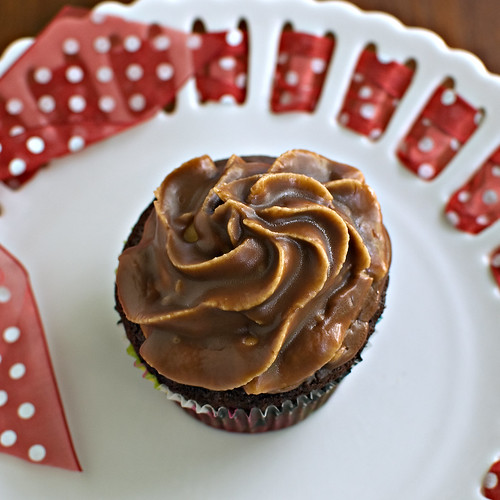
ChPBCC-styled-top

I'll list the recipes below and provide a link for a printable recipe as well (NEW FEATURE ALERT). I plan on adding printable recipes to archived posts, but it'll take me some time. In the mean time, I've condensed the ridiculous amount of photos I took into some collages. Individual photos are at my flickr photostream if you just can't get enough choco-peanut butter goodness.
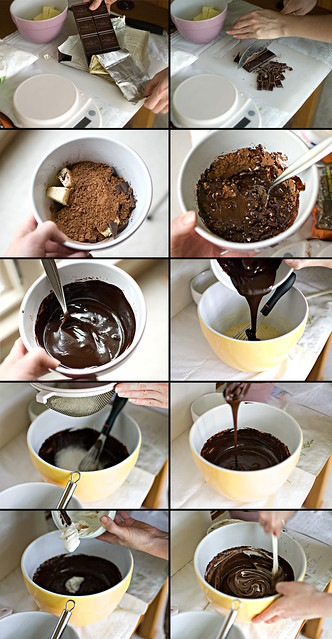
cake collage

First things first: The Cake. I found this recipe from Cook's Illustrated featured on a number of blogs. It comes together a bit like homemade brownies, using bittersweet chocolate, cocoa and butter all melted together then added to an egg-sugar mix. Next, you add the rest of the ingredients, the usual suspects like flour and leaveners, but this recipe also includes sour cream. Another level of richness to an already heady lineup of ingredients.
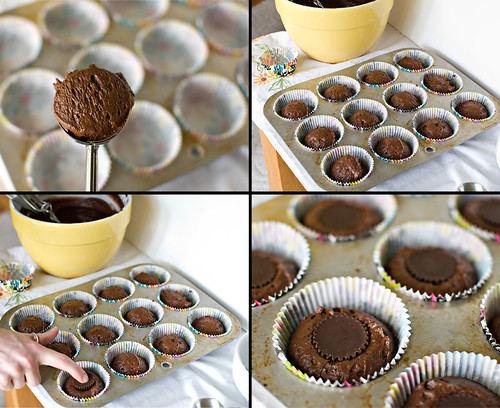
filling-pressing

As you can see, the batter is very thick and almost fluffy. It's not like a typical cake batter. I used my large Pampered Chef scoop to get the batter into the paper liners (which are adorable, don't you think? psst...I got them at Michael's).
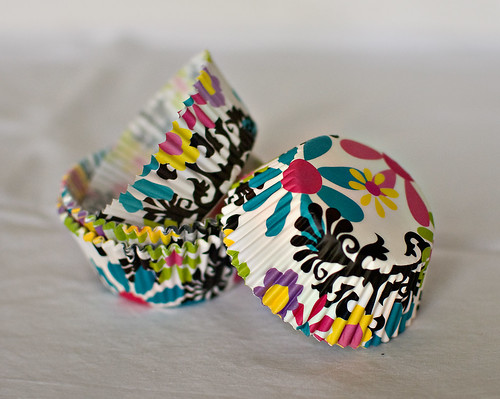
ChPBCC-liners

But did you see what I tucked in the batter? Mini Reese's Peanut Butter Cups. I used the dark chocolate ones, but you can use regular, if you prefer. Based on a suggestion I found while browsing for recipes, you can freeze them for 20-30 minutes prior to baking. I did, but I'm not sure what difference it made. Maybe the centers would melt a bit if left room temp? As it was, mine stayed pretty much "as is" except the outer chocolate melted, creating these cute little divots.
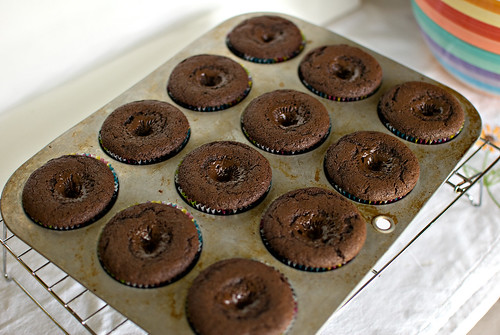
ChPBCC-baked

These divots are evident when you cut down the center like I did for the first photo. When you're shoving them in your face, though, you never even know it's there. You could easily pipe a dollop of frosting in there first then pipe the swirl if you just can't handle the thought of there being even a smidge of wasted frosting coverage.

Next came The Frosting. Oh, my. This frosting. It's incredible. It's made of butter, peanut butter, powdered sugar and whipping cream — what's not to like?
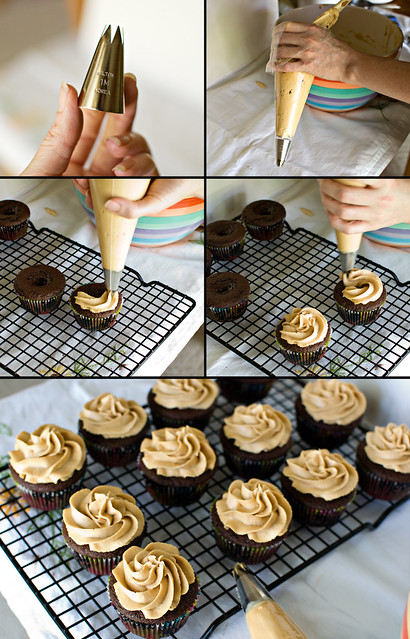
tip-frostingtech

I used my Wilton 1M tip, filled a disposable bag, and went to town.

Heaven, whipped into a pale golden fluff.
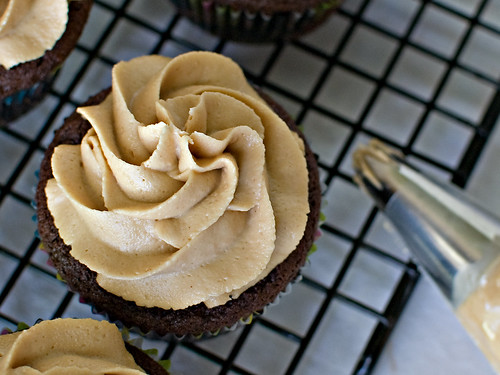
ChPBCC-frosted-close-top

 If I'd stopped right there, these would still be amazing. But I had an idea – take the peanut butter cup idea and apply it to the frosting. Let's dip 'em in chocolate coating. So I went looking for a homemade "magic shell" kind of recipe. I knew they were out there (Google it - there are a number of variations) but what surprised me was that the secret ingredient wasn't paraffin–my suspicion–but coconut oil. Why coconut oil, you ask? Well, because it's solid at room temperature. It's melting point is 76°F so keep it below that, and you've got a (relatively) solid chocolate shell. Granted, it stays much more solid on something really cold like ice cream, but put the cupcakes in the freezer before dipping and keep them in the fridge after, and you're good to go. (Which also means this wasn't the BEST idea for a cookout recipe, but I didn't hear any complaints.)
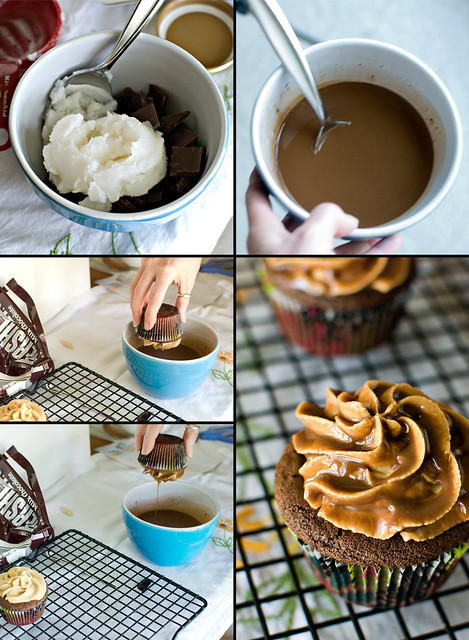
dip collage

(Oh, goodness. All of that dipping took me back to my Dairy Queen days—back in the olden days. You know, High School.) The dip was a little thin, but Dwight had the best idea "Why not dip them twice?" Done and done.

ChPBCC-magicshell-DblDip

I packed them into my (really crappy) cupcake carrier and we headed off to the cookout.
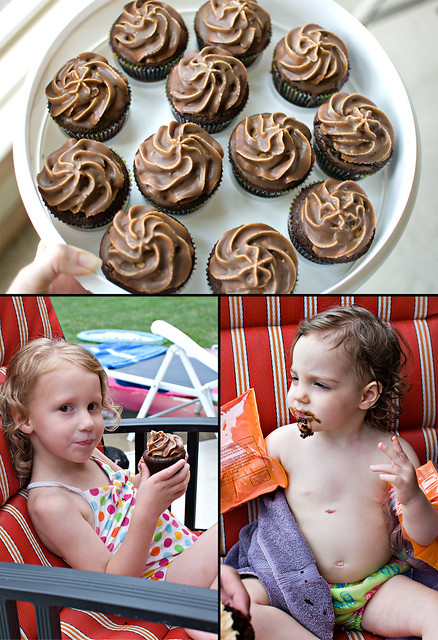
eating collage

They were a big hit, with kids...

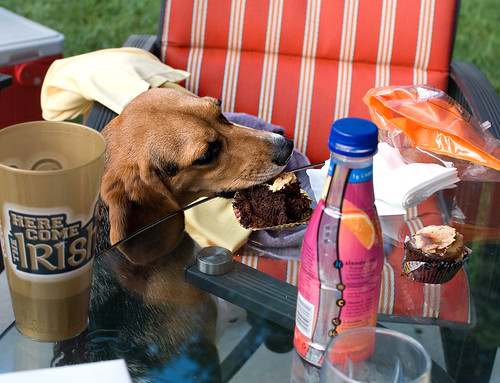
ChPBCC-dog-eating
and dogs alike. (Don't worry, she only had a some of the frosting, and a tiny bit of chocolate.)


Now let's get to the recipes!

Dark Chocolate Cupcakes 
(with Reese’s PB Cup Center)
Adapted from Cook’s Illustrated
Makes approx 12 (I got 15 out of it with plenty of batter left on the sides of the bowl for me to enjoy. What?)

Ingredients
8 Tbsp unsalted butter
2 oz bittersweet chocolate, roughly chopped (I used Ghiradelli)
1/2 cup (1.5 oz) Dutch processed cocoa (or regular if that’s what you’ve got handy)
3/4 cup (3.75 oz) All-purpose flour
1/2 tsp baking soda
3/4 tsp baking powder
2 eggs
3/4 cup (5.25 oz) granulated sugar
1/2 tsp salt
1/2 cup (4 oz) sour cream (you could use reduced fat, but really…why bother)
12-15 mini Reese’s Peanut Butter Cups

Directions
Preheat oven to 350°F. Line tin with cupcake liners.

Combine butter, chopped chocolate and cocoa in a small bowl. Microwave 30 seconds then stir. Microwave at 15 second intervals until smooth. (It only took me the first 30 seconds plus 15 more before it was smooth and glossy.) Don’t overheat! Alternately, you can get fancy and use a double boiler, or a glass bowl over a pot of simmering water.

Cool until barely warm.

In small bowl, combine flour, soda and powder.

In a medium-ish bowl, beat the eggs then whisk in the sugar and salt. Add the cooled chocolate mix, beating until smooth and well combined. Sift 1/3 of the flour mixture into the chocolate mixture. Whisk until fully combined. Add sour cream, mixing well, then add remaining flour mixture, whisking till flour is fully incorporated and batter is thick.

Scoop batter into lined tins using you preferred method—spoon, ice cream scoop, measuring cup. Place a mini Reese’s cup in the center of each cake. Press into the batter until nearly level with the top.

Bake 15-20 minutes (original recipe said 18-20 but mine were most definitely done at 15 minutes). Check doneness with toothpick. If it comes out clean, you’re good.

Cool for 5-10 minutes in the pan, then move to a wire rack to cool thoroughly before frosting.

Printable Recipe Here


Fluffy Peanut Butter Frosting
Adapted from browneyedbaker.com
Easily covers 18 cupcakes, and that’s if you have a heavy hand.

Ingredients
1 cup creamy peanut butter
5 Tbsp unsalted butter
2 cups powdered sugar
1/2 - 2/3 cup whipping cream (heavy cream) adjust as necessary - add more if it looks like it needs it. Go wild.

Directions
Beat peanut butter, butter and powdered sugar until thoroughly combined. Add cream and beat until light and fluffy. Give it a few minutes to get nice and pale and lovely. Lick the beaters. No, really. Do it. It’ll make you feel like a kid again.

Spread onto cooled cupcakes or pipe with your preferred decorating tip.


Homemade Magic Shell
Adapted from Confessions of a Cookbook Queen

Ingredients
3 regular size Hershey bars, broken into smaller bits
1/2 cup coconut oil

Directions
Combine chocolate and oil in small, deep bowl. Microwave for 30 seconds. The oil will have melted, but the chocolate will still be partially solid. Microwave at 15 second intervals until the mixture is smooth. It won’t take long.

Pour over ice cream or dip frosted cupcakes that have been in the freezer at least 15 minutes. Take cupcakes out just a few at a time. If you’re double dipping, place cupcakes back in the freezer for a few minutes before re-dipping.

Enjoy! Sure, it’s not exactly health food, but it’s got to be at least a little better for you than the processed stuff in a squeeze bottle.

Just for the record, I had plenty of this left over after double dipping 12 cupcakes–a good 1/2 cup or more left. It’ll keep in the pantry for a while, but if you put it in the fridge, it’ll turn solid and you’ll need to nuke it before using.

Printable Recipe Here

********************
I hope you made it all the way through that post; it was a whopper. And let me know what you think of the printable recipes. Do you want them with pics, or do you prefer text only. What about the size? Is full page good, or do you prefer recipe cards? 


Let me know in the comments!

Wednesday, January 27, 2010

Kahlua Chocolate Chip Cookies

CCC-1
Perhaps not surprisingly, I've always loved to bake, especially cookies. I've been making Toll House chocolate chip cookies for just about as long as I can remember. I memorized the recipe by the time I was about 12 years old and have only strayed from it a few times. I flirted with the legendary Neiman Marcus cookies (this version) — and completely believed the story the first time I heard it, long before the advent of viral email. Before the advent of email, period, at least for me. I've bookmarked countless others and have read many rave reviews of the infamous New York Times version. (I'd still like to give that one a shot.)

But I always come back to the back of the chocolate morsels bag, knowing I'll get a good chocolate chip cookie without having to wait for an overnight chill down in the refrigerator (one of the "secrets" to the NYT recipe).

No, this probably isn't the BEST chocolate chip cookie recipe ever, but it's very, very good. It is a twist on the Toll House recipe, kicking up the flavor a bit with Kahlua and espresso powder. They're best fresh from the oven, not surprisingly, but you can get that fresh-from-the-oven gooey-ness by nuking them in the microwave for about 10 seconds. Mmmm...

Kahlua Chocolate Chip Cookies

1 cup (2 sticks) unsalted butter, room temperature
1 cup brown sugar, packed
3/4 cup granulated sugar
2 eggs, room temperature
3 tablespoons Kahlua or other coffee liquor
3 cups all-purpose flour
2 teaspoons instant espresso powder
1/2 teaspoon cinnamon
3/4 teaspoon baking soda
3/4 teaspoon salt
3 cups semi-sweet chocolate chips

Preheat oven to 350°F. In medium bowl, whisk together flour, espresso, cinnamon, soda and salt. Set aside. In large mixing bowl or stand mixer, beat butter until smooth, then add both sugars. Beat until light and fluffy. Add eggs one at a time, beating well between each addition, then add liquor. Add dry mix to creamed mixture and beat well. The dough will be pretty stiff. Mix in chocolate chips.

Drop by tablespoon on to parchment lined baking sheet. Bake 9 minutes, or until just turning golden brown, erring on the side of slightly underbaked. Pull pan from oven and let rest on sheet about 4 minutes. Remove cookies from sheet to cool on wire racks. Cool pan before next batch. I have two sheet pans going, one in the oven, one cooling. It takes a bit longer, but works better to have the pan cooled down. It can be a bit warm, just not hot.

Makes approximately 48-52 cookies. I got about 52 using my medium Pampered Chef scoop.

mini cake stand
Now let's talk about this adorable cake stand for a minute, shall we? It was a present from my mom and dad for Christmas. In fact, they got me all kinds of totally adorable baking goodies.

Look at this!
xmas loot
The cake stand, cute labels, goody boxes, cupcake liners... and .... the cupcake stand. Isn't it crazy adorable? Unfortunately no one got a picture of my reactions to these gifts as I was opening them. It would have been hilarious. I squealed and clapped like a 2 year old at her birthday. I couldn't help it. I mean, LOOK at that stuff. Isn't it great?!

Monday, December 21, 2009

Christmas Baking that's not just for Christmas

Although I still have a few things on my list yet to make, I thought I'd fill you in on what I've made so far. The great thing about all of these recipes is that none are inherently "Christmassy". You could bring any of these to a 4th of July potluck and no one would look at you askance. 


palmier=overhead
palmier-scale
Cinnamon Nut Palmiers adapted from Budget Bytes
OK, someone might think these would be a little odd for 4th of July, but they'd quickly change their mind after trying one. Simple, easy and delicious.

Ingredients
1 box (2 sheets) frozen puff pastry
2 Tbsp honey
2 tsp cinnamon
4 Tbsp brown sugar
4 Tbsp chopped pecans
confectioners (powdered) sugar for dusting counter

Directions
Thaw the box of puff pastry either on the counter at room temperature or in the refrigerator over night. (Make sure to leave out only for the time listed on the box. I left mine out too long and it turned into a solid chunk. I couldn't unfold it like you're supposed to. I had to roll it out with a rolling pin.)

Preheat the oven to 400 degrees.

Sprinkle a clean counter top with powdered sugar to keep the dough from sticking. Unfold the dough and lightly drizzle with honey (about 1 Tbsp per sheet). Next, sprinkle with half of the cinnamon, brown sugar and pecan mixture.

Roll up each side of puff pastry inward until the two sides meet. (Like you're rolling up cinnamon rolls, but stopping at the half-way point and rolling from the opposite end to meet it.)

Using a sharp knife, cut log into 1/2" sections and place on a parchment lined baking sheet, about 2 inches apart—they need room to puff up. Make sure they're tightly rolled. You can adjust each cookie a bit as you go. If they're loose, they'll unroll as they puff and bake.

Bake at 400°F for 10-15 minutes. Check at 10 minutes and keep an eye on them. You want them golden brown but not dark brown. The sugar will burn fairly quickly. Immediately transfer to a cooling rack, flipping them over as you do. The filling pools a bit at the bottom and flipping them over will keep them from sticking to the cooling rack. The filling becomes a hard, candy-like crust, but they're surprisingly light and not overly sweet. VERY good.


PB-pated
Peanut Butter Buttons
I've posted this recipe before. I used my smallest Pampered Chef scoop this time. It's approximately a tablespoonful and makes 2" cookies. I got about 177 cookies out of this recipe. These would also make excellent slice-and-bake cookies. Make ahead, roll into logs, keep in fridge or freezer, baking as the urge strikes. These also freeze amazingly well already baked. 
Ingredients
1 1/2 cups butter
1 1/2 cups creamy or crunchy peanut butter, your choice
1 1/2 cups sugar
1 1/2 cups brown sugar
3 eggs
3/4 teaspoon salt
1 1/2 teaspoons baking powder
2 1/4 teaspoons baking soda
3 3/4 cups flour

Directions
Cream peanut butter and butter, add sugars and mix well.
Add eggs and mix until creamy.
Add remaining ingredients.
Chill for one hour and chill between batches.
Drop by tablespoonful onto cookie sheets—do not flatten.
Bake at 325°F for 10-12 minutes for smaller cookies, about 15 minutes if you use a larger scoop. You want these barely done.

Cool on cookie sheets for about 5 minutes then transfer to cooling racks or kraft paper (to soak up some grease). Store in airtight containers or zip top bags.


cc shortbread
Chocolate Chip Shortbread adapted fom Not Without Salt
Made approximately 79 cookies
Not overly sweet, just buttery and light with a nice touch of chocolate. Oh so good with a hot mug of your favorite cold weather beverage.

Ingredients
3/4 pound butter (3 sticks), softened
1 cup sugar
1 teaspoon pure vanilla extract
3 1/2 cups flour
3/4 teaspoon kosher salt
6 ounces mini chocolate chips

Directions
Preheat the oven to 350 degrees F.

In the bowl of an electric mixer with the paddle attachment, cream together the butter and sugar until they are just combined. Add the vanilla. In a medium bowl, sift together, with a whisk, flour and salt; then add them to the butter-and-sugar mixture. Mix on low speed until the dough starts to come together. Add the chocolate chips until just mixed in. Roll into a log(s) and wrap in wax paper or parchment. Chill until firm. I got two, approx 15" logs out of this at about 1-1/2 inches in diameter. You don't have to be precise.

Carefully slice the log into 1/4″ cookies. Place the cookies on an sheet pan covered with parchment. Bake for 11-13 minutes, until the edges just begin to brown. Allow to cool the store in airtight container or plastic bag.

monster
monster-dough

Monster Cookies adapted by me from the basic Toll House recipe
I doubled this and got approximately 77 cookies from it.
I was going to use regular M&Ms for these, but then saw the bag of peanut butter ones and knew they HAD to go in these cookies. Good call. 

Ingredients
1 cup (2 sticks butter), softened
3/4 cup sugar
3/4 cup brown sugar, packed
2 eggs
1 tsp vanilla
1-3/4 cup all-purpose flour
1 cup old fashioned rolled oats
1 tsp baking soda
3/4 tsp salt
6 oz semi-sweet chocolate chips (1/2 bag, add entire bag if feeling wild and crazy)
1/2 cup chopped walnuts
1/2 bag peanut butter M&Ms (the large bag, not an individual portion one)

Directions
Preheat oven to 350°F.
Beat butter and sugars. Add eggs one at a time, beating well after each. Add vanilla.
Combine flour, baking soda, salt and oats in medium bowl. Mix well then add to butter mixture. Beat until well combined.
Add chips and nuts and mix by hand until evenly distributed.
Drop by rounded tablespoon on to parchment lined baking sheets.
Bake at 350°F for 10-12 minute or until edges brown and cookies are almost set. Let them rest on the cookie sheets for 3-5 minutes before transferring them to a cooling rack.
Makes approximately 3 dozen cookies.

Just FYI, if you don't add enough flour, they look like this:
monster-too flat
Not pretty. Also, it might be a good idea to leave out the M&Ms and press into top of each cookie just before baking.


babka sliced
Chocolate Babka from Cooking Light Dec 2009
Makes one loaf (I doubled this and got three "large" and 2 mini disposable aluminum bread pan sized loaves)

Dough:
1 teaspoon granulated sugar
1 package active dry yeast (about 2 1/4 teaspoons)
3/4 cup warm milk (105-110 degrees)
6 tablespoons granulated sugar
1/2 teaspoon vanilla extract
1/4 teaspoon salt
1 large egg yolk, lightly beaten
7.5 ounces all-purpose flour (about 1 2/3 cups), divided
5.85 ounces bread flour (about 1 1/4 cups)
5 tablespoons butter, cut into pieces and softened
Cooking spray

Filling:
1/2 cup granulated sugar
3 tablespoons unsweetened cocoa
1/2 teaspoon ground cinnamon
1/4 teaspoon salt
4ounces semisweet chocolate, finely chopped (I used chocolate chips)

Streusel:
2 tablespoons powdered sugar
1 tablespoon all-purpose flour
1 tablespoon butter, softened

Dissolve 1 teaspoon granulated sugar and yeast in warm milk in the bowl of a stand mixer; let stand 5 minutes. Stir in 6 tablespoons granulated sugar, vanilla extract, 1/4 teaspoon salt, and egg yolk. Weigh or lightly spoon flours into dry measuring cups; level with a knife. Add 6 ounces (about 1 1/3 cups) all-purpose flour and bread flour to milk mixture; beat with dough hook attachment at medium speed until well blended (about 2 minutes). Add 5 tablespoons butter, beating until well blended. Scrape dough out onto a floured surface (dough will be very sticky). Knead until smooth and elastic (about 10 minutes); add 1.5 ounces (about 1/3 cup) all-purpose flour, 1 tablespoon at a time, to prevent dough from sticking to hands (dough will be very soft).

Place dough in a large bowl coated with cooking spray, turning to coat top. Cover and let rise in a warm place (85°), free from drafts, 1 1/2 hours or until doubled in size. (Gently press two fingers into dough. If indentation remains, dough has risen enough.) Punch dough down; cover and let dough rest 5 minutes.

Line the bottom of a 9 x 5-inch loaf pan with parchment paper; coat sides of pan with cooking spray.

To prepare filling, combine 1/2 cup granulated sugar, cocoa, cinnamon, salt, and chocolate in a medium bowl; set aside.

Place dough on a generously floured surface; roll dough out into a 16-inch square. Sprinkle filling over dough, leaving a 1/4-inch border around edges. Roll up dough tightly, jelly-roll fashion; pinch seam and ends to seal. Holding dough by ends, twist dough 4 times as if wringing out a towel. Fit dough into prepared pan. Cover and let rise 45 minutes or until doubled in size.

Preheat oven to 350°.

To prepare streusel, combine powdered sugar, 1 tablespoon all-purpose flour, and 1 tablespoon softened butter, stirring with a fork until mixture is crumbly; sprinkle streusel evenly over dough. Bake at 350° for 40 minutes or until loaf is browned on bottom and sounds hollow when tapped. Cool bread in pan 10 minutes on a wire rack; remove from pan. Cool bread completely on wire rack before slicing.

This is really good at room temperature, but nuke a slice in the microwave for 10 seconds... bliss.

babka loaves

Wednesday, December 2, 2009

Pumpkin Pie Brioche Monkey Bread

monkey bread-done

So after I made the pumpkin pie brioche sticky buns, I had half a batch of dough left. If you'll recall, this is a no-knead, make-ahead bread dough you store in the fridge until you're ready to use it. I made half a batch—enough for two 1-pound loaves—so I had about a pound at my disposal. I'd seen a reference to monkey bread recently and realized that it would be a fun way to use up the dough.

I didn't realize how freakin' AWESOME it would be. Seriously, this blows the sticky buns out of the water. The monkey bread tastes amazing warm from the oven, but it's so good for breakfast the next day.

So let's make some, OK?

You'll need about a pound (16 oz) of dough and the following ingredients:

1/2 stick (2 oz) butter, melted
1/2 cup granulated sugar
1/2 cup brown sugar, loose–not packed
1 Tbsp cinnamon

Melt the butter in a small bowl. Combine sugars and cinnamon in a large zip top bag. Shake to mix.

sugar in bag2 
Spray a bundt pan with cooking spray.

Using kitchen shears, snip 1/2"-1" chunks of dough and form into a rough ball. They don't have to be perfect, and they can be of varying sizes. Just remember that they will rise and become almost doubled after proofing and baking.

dough blob
 
Dip the dough ball in the melted butter and pull out with a slotted spoon.
Drop into sugar bag. Repeat with about 4 more pieces. You don't want to crowd the bag.

dough in butter

Gently shake the bag to completely coat the pieces then place in the bunt pan.

dough in bag
start layering dough
Repeat with remaining dough. You'll end up with left over sugar. You can sprinkle more over the top if you want.

Cover with plastic wrap and let proof for at least 40 minutes up to an hour.

dough layered
dough proofed

Preheat oven to 350°F. Bake about 30-35 minutes until browned and internal temp is around 190-195°F.

baked in pan

Immediately turn out on to plate. Let cool a few minutes then DIG IN!

monkey bread-piece
monkey bread-piece2

The insides are soft and sticky with cinnamon-y goodness and the bottom (that used to be the top) is a bit crunchy and carmel-y.

It rocked my world.

Sunday, August 23, 2009

Ganache-Filled Vanilla Bean Cupcakes with Ganache-Dipped Strawberries


First things first, I want to give a shout out to Stephanie at Wasabimon for the inspiration for these cupcakes. Stephanie is a fabulous food blogger with gorgeous photography and tons of great recipes, many gluten-free. I know plenty of people out there have gluten allergies, including my sister, so it's nice to have resources like Wasabimon out there.

No beating about the bush with this post, we're going to get right to it. The title is a mouthful as are the cupcakes. And OH, what a mouthful they are. Here's how to make your own.


The Recipes

Vanilla Bean Cupcakes
reproduced with permission from Rachel Rappaport, Coconut & Lime
Thanks, Rachel!

  • 2 cups flour
  • 1 cup sugar
  • 3/4 cup milk
  • 1/2 cup butter, at room temperature
  • 1 egg, at room temperature
  • 1 vanilla bean, cut length-wise
  • 2 teaspoons baking powder
  • 1 teaspoon salt

Directions:

In a small saucepan, heat the milk and vanilla bean together until the milk just boils. Remove from heat and let cool for about 1 hour. Then remove the vanilla bean. Scrape out the seeds from the vanilla bean and add them to the milk. Discard the remaining bean pod. Meanwhile, preheat the oven to 350. In a medium bowl, whisk together the salt, flour and baking powder. In a large bowl, cream together butter and sugar until light and fluffy. Add egg and beat well. Alternately add the flour and milk mixture until well combined. Divide batter into about 20 lined or greased cupcake wells. Bake 15-20 minutes or until a toothpick inserted in the middle of the middle cupcake comes out clean. Cool on a wire rack and then ice.


Vanilla Bean Buttercream Frosting
  • 1 lb. confectioners' sugar
  • 1/2 c. butter, softened
  • 1 tsp. vanilla extract
  • 1 Vanilla bean, scraped
  • 3 tbsp. milk
Beat together sugar, butter, vanilla, seeds from vanilla bean and milk until smooth. If necessary add more milk until frosting is spreading/piping consistency.


Ganache (feel free to halve!)
adapted from Alton Brown, Food Network

  • 3 tablespoons corn syrup
  • 6 ounces heavy cream
  • 12 ounces dark chocolate, chopped into small pieces
Put chopped chocolate in heat-proof bowl. In a small saucepan, combine the corn syrup and heavy cream. Bring to a simmer. Pour over chocolate. Stir until smooth. Cool to room temperature before using.

Bring it all together

After the cupcakes and ganache have cooled, fill a pastry bag fitted with a small star tip with the ganache. Push the tip all the way into the cupcake and gently squeeze the bag until the top of the cupcake rises and the ganache starts to push back. It will pop out of the top a bit. No problem. You'll be covering that up with the buttercream. Speaking of...

After filling all of the cakes, clean out the pastry bag and tip and fill with the buttercream. Pipe as you see in the photos, or in your preferred style.

Clean and dry your strawberries. Gently reheat your ganache in the microwave until it's just thin enough to allow for dipping. You don't want it too thin or warm, just just a few seconds should do it.

Take the berries by the tops, dip and swirl in the ganache. Let most of the extra to fall back into the bowl, then gently place the berry on top of the cupcake, pushing part way into the buttercream. The little bit of extra ganache will puddle on top of the frosting.

Pop in the fridge if not eating immediately. Remove from fridge at least 20 minutes prior to serving so that they're not cold.

Trust me. These are as good as they look. The cupcake recipe is so easy and oh-my-goodness delicious. It would be great with just about any frosting/flavor combo you can dream up. The ganache filling and dipped strawberries really put these over the top.

Tuesday, March 31, 2009

Birthday Dinner—In Pictures

Well, mostly in pictures. I'll give some commentary, too.

Clearly my baguette shaping skills need improving. I made the dough ahead using the 
Master Recipe from Artisan Bread in Five Minutes a Day, that way 
all I had to do was shape and bake the day of.


As you might know, Dwight's birthday was last Thursday. Due to schedules and the fact that it was a "school night," I decided to make Dwight a special dinner on Friday instead. Since he loves seafood, I decided to try my hand at crawfish etouffee. I used this recipe and made minor modifications — used crawfish instead of shrimp, added bay leaves and some cayenne pepper. It was delicious.

The "holy trinity" of creole and cajun cooking — onion, bell pepper and celery.

The roux, just starting out. It turned the color of peanut butter by the time I called it done. I could have gone another 5 minutes, I think, but I was happy with it.


And then there was dessert.

I knew I wanted to make something with chocolate, so I went to one of my go-to recipe sites, Smitten Kitchen. Deb, SK's award winning blogger, also has a chocolate-loving husband. It just so happens that the recipe I chose was one she made for her husband's birthday a few years ago. It combines three of Dwight's faves — chocolate, cheesecake and brownies.


Click any photo to enlarge
Related Posts Plugin for WordPress, Blogger...