Tuesday, January 31, 2012

Art Journal 01.31.12 — Free

AJ-0131-flower-full

This page was inspired by a few things. First of all, the background was created so I could mess up my hands for this photo.

hands-week4

You can see the patterns in the paint on my hands on the page, even though I brushed over it, smearing all of the various textures together.

AJ-0131-free
See the blue areas to the right and along the bottom? You can see that pattern in white on my hands. That's from sequin waste, also called punchinella.

Another influence is a canvas my niece painted for me for Christmas 2 years ago.

m-canvas

It's one of my most treasured possessions. I was so touched that she painted it for me and love how strong and bold it is. Just like my niece, actually!

The other influence on this page is the art of Alisa Burke. She's wonderful and I hope to take at least one of her online classes very soon.


I love the "stained glass" effect that happened when I added the wax pastels in the petals. Wasn't intentional, but I think it's very cool.

AJ-0131-stained effect

For the flower, I wasn't sure how I was going to handle "coloring" it, but I went with the pastels because they'd be transparent. I kept looking at the strong black outline and thinking I needed to add to that, doodle a bit and then add the white for some contrast. I'm really happy with how it turned out.

AJ-0131-detail

Mediums Used:
acrylic paint, various colors
water soluble wax pastels
ink

Other Materials:
punchinella
bubble wrap
shelf liner
paint brushes in various sizes (bottoms used to make the white dots)


Sunday, January 29, 2012

52 Week Photo Project — Week 4: Self-Portrait

hands-week4

I'd honestly intended to take a picture with my face in it. Kind of needed a new headshot anyway, but I had the idea for this shot and just knew it was what I wanted to do for this assignment. This is an accurate portrait of me in this time and space. Reveling in paint, ink, pastels—anything getting my hands dirty creating, making.

Tuesday, January 24, 2012

Making a Mess

mess-finished

Sometimes winging it means making a mess. Eh, it happens. I wanted to play with modeling paste and a sketch I'd scribbled out months ago, so I did. And it got ugly. I tried to cover things up, add, drip, shade, but it just never came together.

mess-start
Getting started. See my sketch reference to the left. That cardboard ring is from a roll of stickers from work. I used it as the template for the face. I used the green circle thingy as a stencil for the modeling paste.

mess-colors
I used my water soluble wax pastels to color in the face and hair.

mess-face
You can kind of see where I'd randomly placed some masking tape before I gessoed over the top.

mess-modelingpaste
Modeling paste applied. Not loving it at this point... and it all went down hill from there...

mess-face-finished

Sometimes you just end up with a mess. And have a lot of fun doing it! Sure, there was some frustration, but mostly I just laughed about it. Enjoy the process, learn, move on. YAY, ART!

Monday, January 23, 2012

Permission Slip — Free Printable

If you're anything like me, you find it really difficult to give yourself permission to want the things you want. We feel the need to apologize, rationalize or justify what it is we really want to do.

To help you out, I've created these little permission slips so you can finally take the time to acknowledge what you want. Big or little, it's time to give yourself permission to do the thing, that one thing you keep putting off. And I've made these 4-up so you don't get just one slip. Keep a stack handy and give yourself permission to dream, rest, be... whenever you need it.

Click here to download high-res pdf (500k)
Click here to download high-res PDF
(5MB sorry-smallest I could make it and keep it high-res!)

Sunday, January 22, 2012

52 Week Photo Project — Week 3

week3-thingyoulove

This week's theme is "Your Favorite Thing." LensProToGo elaborated on the theme on their blog:
We want everyone to get to the core of this and find something that they like more than everything else and hold close to their heart. What is the one thing you would most likely save if your house was on fire (considering your family, including all animals, were safe). If you could only keep 1 thing (again considering you could keep your family and pets) what would you want to save?

I like that they added the "in case of fire" explanation. It really made me think about the assignment. I, of course thought of things like all my photos, my computer or CD/DVD back ups, but that seemed too obvious. I wanted to dig deeper.

I mentally scanned my house, thinking of objects in each room, assessing their value. Not monetary but emotional. It was eye opening how many things I thought of as replaceable or not "fire scenario" significant.

As soon as I thought of this, though, I knew it was the one. I picked an oil painting that hangs in my home office. It's on the wall right now, up and to my right, looking beautiful against the "library green" wall. Neither the subject matter nor artist are what makes this painting so special for me, though. It's all of the meaning and emotion behind it.

oilpainting

My mom gave me this painting which was given to her by Marian, my godmother. I never met Marian. She passed away shortly after I was baptized. Marian was my mother's mentor, confidant and I suspect, a kind of second mother. They were very close. I know my mother cherishes this painting because Marian gave it to her, so it means that much more that my mom, in turn, gave it to me. I would be positively devastated if anything happened to it (which is why I should probably take it to a reputable restorer to make sure it is and stays in good shape. The label on the back is brittle and falling off and I noticed some crackling in the paint.

painting-back
cracking paint

It most certainly qualifies for the "in case of fire" scenario posed by LensProToGo.

What about you? What is YOUR favorite thing, the one thing you'd want to save? Trust me, it's a very thought-provoking and emotional question.

Tuesday, January 17, 2012

Soft Sugar Cookies

bite

These aren't THOSE soft sugar cookies, the ones going around duplicating the grocery store cookies (although I DO want to try those). These are the soft sugar cookies my mom would make when I was a kid. She got the recipe from a neighbor who got it from... who knows. Basically, this is what I consider our family recipe. I've been wanting to share it with you for a couple of reasons. 1. Because they're awesome. 2. Because they're easy. And 3. Because I haven't had them in YEARS and I really needed to make them.

soft sugar cookies-card
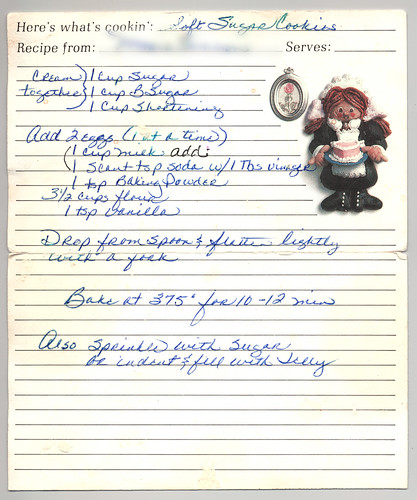
Doesn't my mom have pretty handwriting?

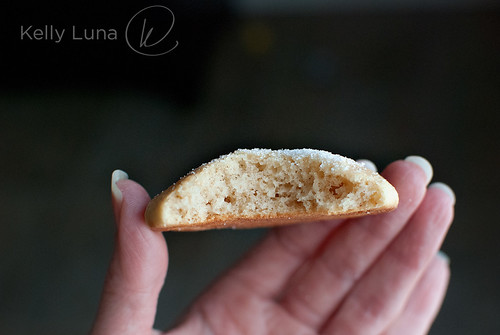
These are not pretty cookies.

baked-onpan

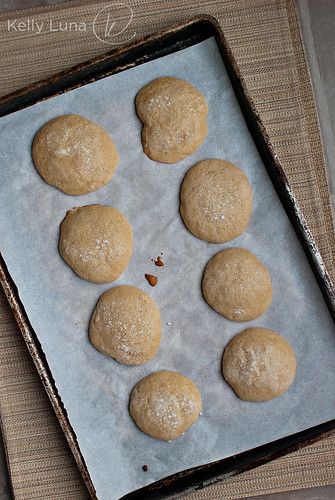
They're not going to win any cookie beauty contests, but I'm betting they'll win your family and friend's seal of approval. They're light and fluffy and it's really easy to eat three of them and not even realize it. Wait. Ok, so that's probably NOT an endorsement if you're looking to avoid sweets. Feed 'em to your kids, co-workers and neighbors. They'll gladly take them off your hands. So let's make them, shall we?

What gives these their unique texture and taste is some fun chemistry. (Kids love this - I always did, and still do!)

You take a scant teaspoon of baking soda, put it in a one-cup measuring cup, add a tablespoon of white vinegar and watch the magic. Swirl it around to dissolve completely, then fill the cup with milk. Any kind is fine. We grew up drinking 2% but I don't see why skim or whole wouldn't work.

soda-vinegar-milk

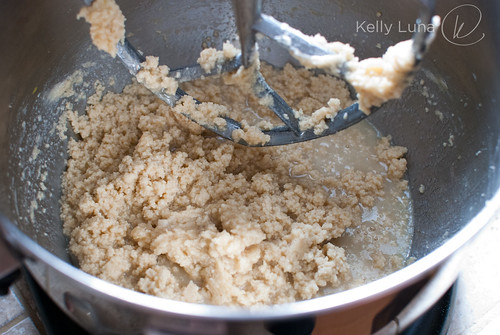
After you cream the butter and sugar, add the eggs and vanilla, you add the milk mixture. It's going to get ugly.

batter-aftermilk

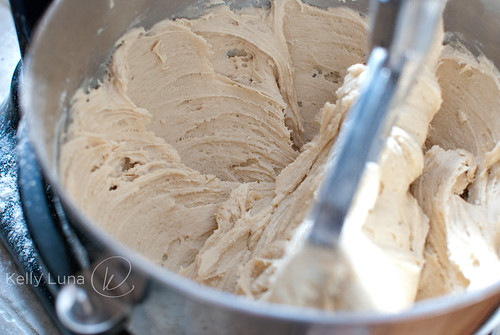
But don't worry. After you add the dry ingredients, it comes together beautifully.

dough-smooth

And sticky. You've been warned.

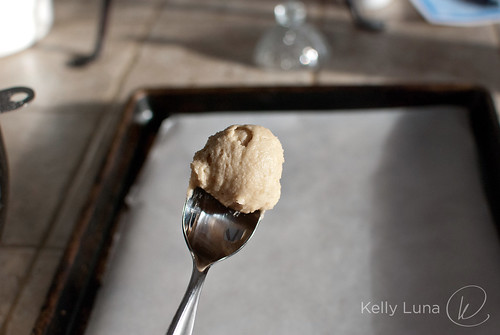
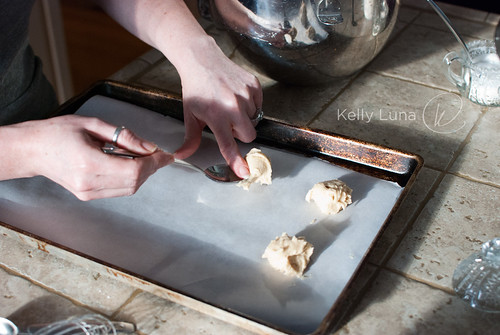
We're going old school with this, just like I did as a kid, and using a regular spoon to get these on the pans. I would normally use one of my cookie scoops, but I wanted to keep this authentic.

dough-spoon1
dough-onpan

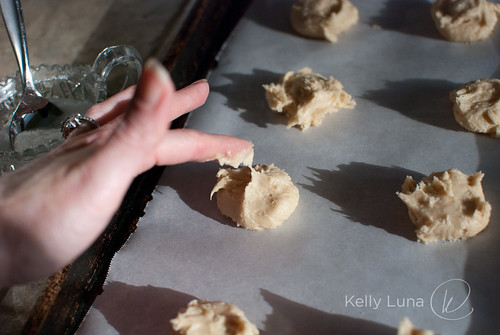
When you flatten the cookies slightly (you can use a fork like it says in the hand written recipe card, but my mom never did) be sure to dip your finger in water. It'll keep if from sticking. I forgot that on the first pan-full. Oops. Oh, and if you do flatten with a fork, dip that in water first. You'll thank me.

sticky

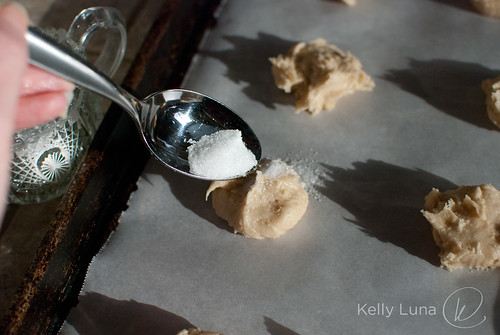
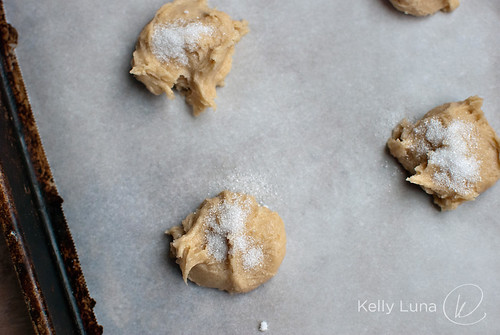
Now sprinkle some sugar on top and pop them in the oven.

sugar
on pan

Bake until the tops are no longer glossy. These won't get brown unless they're severely over baked. They'll melt and flatten, puff way up, the bottoms will brown, and the tops will look done. That's when you pull them out. I recommend NOT using insulated pans. The cookies don't puff up as nicely on them. If your pans are dark, turn the oven down a bit to avoid over-browning the bottoms.

baked

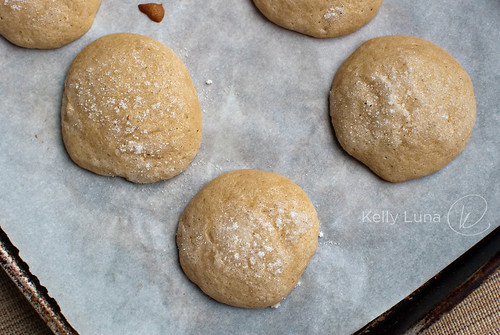
You can sprinkle more sugar over them just as they come out of the oven if you like. You can also use colored sugar for a more festive look.

I hope you like these as much as I do. Let me tell you, a whole flood of memories came back when making and eating these. I love how food can do that.

Soft Sugar Cookies
Yields about 5 - 6 dozen cookies depending on size

Ingredients
1 cup granulated sugar
1 cup brown sugar
1 cup butter (Original calls for shortening. We always used margarine growing up, but these worked great with butter.)
2 large eggs
1 tsp vanilla
1 scant tsp baking soda
1 Tbsp white vinegar
1 cup milk
3-1/2 cups AP flour

Directions
Preheat oven to 375°F if using lighter pans, 360°F if using darker pans.

Cream butter and sugars in mixer. Add eggs one at a time, beating well between and scraping bowl as needed.

Put soda in a one-cup measuring cup. Add vinegar and swirl until all soda is dissolved. Ooh and aah at the chemical reaction! Add milk to fill the cup.

Add milk mixture to butter mixture. It will look curdled. That's what it's supposed to look like. Really.

Add flour and beat until smooth.

Drop by spoonfuls on to parchment lined baking sheets. Flatten slightly with finger or fork, dipping whichever you choose in water first to prevent sticking.

Sprinkle with sugar. Bake 10-12 minutes or until top is no longer glossy and bottoms are lightly browned. Remove to cooling racks.

Best eaten the day you make them, but will keep 3 days in air tight container with layers of wax paper between. The tops will get a little sticky. That's normal. Just toss some more sugar over the tops. Problem solved.

Enjoy! And try not to eat too many all at once.

Inspiration can come from anywhere

colorinspiration-paperstapler

This stack of leftover paper and stapler are just sitting on the counter at work. Last week, I looked at it and thought something like, "I love the way that red pops off the greenish yellow. I'm going to use those colors!" Actually, the thought was less proper sentence structure and more like random words "Colors, wow, like, idea, art journal. YES! Ooooh!" all strung together in one "A HA" kind of moment.

permission
Inspired by the colors from the paper above as well as reminders from other artists to give ourselves permission to make mistakes, have fun and enjoy the process.

I love those moments, those flashes of "A HA". Inspiration can come from anywhere at any time. I try to scribble something down when that happens, but this was burned in my head.  Still, I wanted to take the picture today as a reminder to myself and anyone reading that anything can trigger inspiration.

So tell me, what was the last thing that made you go, "A HA!"?

Monday, January 16, 2012

Here We Go

permission

Or, here *I* go, at any rate. (I hope you enjoy coming along with me.) I thought I would start this blog to document my art and things related because I didn't want to bore the pants of my Something Shiny readers. They're kind enough to read my other babbling, I figured a new spot to babble about art was in order.

swirl closeup

Part of being brave for me is actually getting my art out, sharing it, being brave enough to declare, "I'm an artist" when it sounds laughable to me even now, even in the face of trying to BE BRAVE. But that's who I am, or at least part of who I am. If you found me from Something Shiny, you know that I like to create things — cakes, cookies, cupcakes, the random craft or how-to. Creating is in my blood. I can't help myself. I'm also a bit of a fickle creative type. I like doing ALL sorts of artsy-fartsy things, so it's a mixed bag with me. We'll see where it takes me, one tentatively brave little step at a time.

Sunday, January 15, 2012

52 Week Photo Project — Week 2

This week's assignment — Your Front Door

week2-frontdoor
(I swear, the door is red, not pink. It's looking a bit pink on my laptop monitor.)


I'm participating in the LensProToGo 52 Week Photo Project. Follow along on their blog or flickr.

Thursday, January 12, 2012

A Little Something for YOU

I made another trip to Michaels last weekend. I needed a few things, including some yarn since I sold SIX of my scarves to co-workers. So exciting! While I was there, I thought of you guys and decided to pick up a little something to give away. Hooray!

stamps

It's not much, but these stamps are so darn cute, I should have picked up a set for ME. Here's what you'll get if you win: a set of five mini clear stamps (they're about 2" wide), a stamping block (2.5" square) and two mini ink pads, one in black and one in teal blue. Are you excited?

stamps2

Just leave a comment telling me something you're looking forward to in 2012, and I'll use random.org to pick a winner. Open to all of my readers. I'll mail this anywhere in the world. Good luck!

(I'll draw a winner next Thursday, January 19.)

p.s. Be sure to leave your email address in your comment if it's not in your profile so I can contact you. Or you can email me your address if you don't want to leave it here- somethingshiny at frontier dot com.

Neither Michaels nor Studio G have anything to do with this giveaway, just little ole me saying THANKS for reading my blog. Disclaimer over.

Sunday, January 8, 2012

52 Week Photo Project — Week 1

I must admit, as much as I'd like to improve my photography, I just can't do a 365 photo project. I'm certain it would become a huge source of resentment despite the fact that it would probably improve the way I take and make photos. Once a week, though? Yeah, I can do that. A twitter friend, Rebecca (@hobnob) brought up the subject and I agreed that it would be a fun project. She found the LensProToGo 52 Week Photo Challenge and it looked the the perfect fit — once a week photo assignment, each week's theme announced at the beginning of the month.

Rebecca and I are Bread Baker's Apprentice "graduates" so this seems like a great way to participate in another group project. I'll be posting my photo each Sunday night in conjunction with the LensProToGo deadline.  Be sure to kepp track of Rebecca's progress as well as mine!

The first assignment is to make a self-portrait without you in the photo (something that represents you). I started by gathering various objects and put them on my art table. I took several shots, but they just looked like a big ole mess. I decided to pare down and just pick a few key tools. I'm much happier with how this turned out.

week1-selfport-representation

Baking, art, artsy-crafty, photography, being tied to my Mac - all seemed a good representation. What do you think?

See you again next Sunday for Week 2 assignment — "your front door."

Wednesday, January 4, 2012

Oh, Shut up.

What I said today to the gremlin voice in my head that whispered,

"Who do you think you are?" 

in the form of self-doubt.

I'm working on permanently removing that voice from my head. In fact, I think that's something we ALL need to do, because I'm guessing we've all heard that voice, that nasty little mean voice that tells us we're not good enough. Well I say, screw that guy. I'm living my life on my terms, you rotten bastard, so jog on! (A million trillion bonus points if you know where I got that last phrase.)

livelife-spread1

"You don't have to live your life the way other people expect you to." -- Chris Guillebeau

I first saw this quote quite a while ago now, I think on Gretchen Rubin's blog, The Happiness Project. She did an interview with Chris and this statement took a few seconds to sink in, but when it did, whoa. It was such a powerful thing to read, kind of hit me as a bit of a revelation, although it's basically just a fact.

But I saw it again today and it seemed to come at the right time, so I started a new art journal and decided to use it as some inspiration (along with a photo of a hat I saw on NPR). The journal is just an old book that I'm painting over, first with gesso then whatever I decide to use. I glued three pages together with mod podge so that the pages would be more rigid. (I learned this book trick during one of Christy Tomlinson's workshops.)

book as art journal

I just used gesso and acrylic paint for these pages. Oh, and pen.

livelife-red

So let's kick that nasty gremlin voice to the curb. Who's with me?
Related Posts Plugin for WordPress, Blogger...