Saturday, November 28, 2009

Pumpkin Pie Brioche Sticky Buns

baked-grainy

Before I inadvertently threw myself into the food blogging world, I had what I thought was an epiphany. "What if... I made pumpkin bread — but not like regular pumpkin bread. One made with YEAST. I'm a genius!" I think I even jotted a note in my ever-present idea notebook. Yep, I just found it. It says:
Bread Ideas
   Jalapeno bread
   Yeast Pumpkin Bread

And then I found out that I was not, in fact, the first person to ever come up with such a brilliant plan—for either of them. Yeast pumpkin bread existed long before I thought of it, and while it did put a damper on my illusions of genius, it didn't make me less enthusiastic about the concept.

It wasn't until I saw the words "Pumpkin Pie Brioche" that I finally thought, "That's it. That's the one I'm going to make" and proceeded to drool all over my keyboard as I looked at some of the recipes made with said dough.

I've talked about Artisan Bread in Five Minutes a Day before, but Zoë and Jeff didn't stop there. They teamed up again to create Healthy Bread in Five Minutes a Day which was released last month. I had my copy pre-ordered as soon as I saw the announcement on the ABin5 website and received it the day of the release. Michele, fellow BBA baker over at Big Black Dogs, decided to create a HBinFive baking group. I still haven't decided if I'm going to join. They officially start baking after the first of the year, but in the mean time, Zoë and Jeff are releasing 2 new recipes to tide the challenge folks over. Pumpkin Pie Brioche is the recipe for November. You can find it here.

I mixed up half a batch the Tuesday before Thanksgiving, planning to use part for a Thanksgiving breakfast treat for Dwight and me.


dough bucket

According to the recipe, the dough will be "loose" but will firm up in the fridge. Well, it was still VERY loose when I used it Wednesday night. I had to use a lot of flour to get it out of the plastic container and a lot of flour when rolling it out. It was incredibly slack. I covered the rolled out dough with cinnamon sugar then carefully, with the aid of my scraper and lots of flour, rolled into a log, sealing the ends.

Instead of a knife, I used thread to cut the log into rolls. It works great in general, but was especially helpful with this dough. You slide the thread under the roll, criss-cross the ends over the top, then pull through the dough creating a nice, clean cut.


thread


I placed the rolls on top of the prepared caramel glaze in a jumbo muffin tin.


in pan


I used the BBA recipe for the caramel glaze, the same I used to make the amazing BBA sticky buns. I halved it because I was only making a half-dozen rolls, but realized too late that I should make a full recipe. The small amount of ingredients in my large Kitchen Aid mixer didn't mix quite right. Here's what it should look like — nice and whipped:

CE-caramelmix


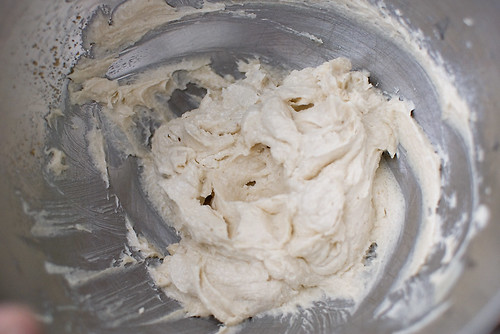
But this time, it was quite heavy:

caramel mixed


The flavor was still great, so no harm, just a lesson in the limitations of my KA mixer. Here's the recipe:


caramel ingredients

Ingredients
1/2 pound (2 sticks) butter, room temperature
1/2 cup packed brown sugar
1/2 cup granulated sugar
1/2 tsp salt
1/2 cup corn syrup
1 tsp vanilla extract (or other flavor of choice)

Directions
Cream butter, sugars and salt for 2 minutes on high speed with paddle attachment. Add corn syrup and extract and cream until light and fluffy, about 5 minutes. Cover the bottom of jumbo muffin tins or baking dish with approximately 1/4" layer of mixture. Then sprinkle with chopped pecans and dried cranberries, if you so choose.

cranberries walnuts


I covered the pan and put it in the fridge overnight. I pulled the pan out when I got up and let it warm up for about an hour or so before baking at 350°F for about 20-25 minutes.

in pan-proofed

I turned them out onto another pan after about 5 minutes and let the caramel glaze cover the turned out buns.

bun-closeup

After a tough 20 minute wait, I gave them taste. Delicious!

bun-plate2

These are best eaten right away. I had one the following day, and while it tasted good, it wasn't the nicest looking roll. Dwight actually said, "What is THAT? Oh, the cinnamon roll." They don't age well.

With all of the other flavors going on, it was a bit difficult to tell what the dough tasted like, but one of the rolls had more bread than cinnamon sugar. I have to be honest and say that it didn't taste anything like brioche. It tasted like a very soft and somewhat gooey whole grain bread. Not bad, but not brioche. It worked great for sticky buns, but I can't see just eating a slice of this bread. Michele at Big Black Dogs made French Toast. I can definitely see using it that way! Basically, this dough needs to be made into something other than just a loaf, at least in my opinion. I just made monkey bread with it (post to come) and it was incredible. Even better than the sticky buns.

Give it a shot! The HBinFive method is SUPER simple.

Some other posts using this dough:
Bread Pudding (Yes, please)
Gorgeous Traditional Brioche
A whole new twist on the usual Pumpkin Roll

Friday, November 27, 2009

Places to Shop—Unique Gifts for the Holidays

It's that time of year again—the official start of the holiday shopping season. Although I love Amazon for just about anything, I have a few other suggestions for places I've found that offer  unique and special gifts.


Etsy
A treasure trove of unique gifts. You can find anything and everything here, from furniture to note cards to jewelry, all handmade. I've purchased a number of gifts from Etsy. Here are a few:

Probably the most unique—A Terrarium from The Oak Leaves shop


I was blown away by how adorable these are! I stumbled upon this shop through a link at Design Sponge (a great resource, by the way).


The perfect gift for the music buff—A recycled record cover journal from Vinyl Frontiers


Yes, it's an actual album cover.  Recycling has never been so fun!


Always clever, often irreverent, and completely adorable stationery from Terry Taylor Designs. She has a holiday special going on, so take advantage!


Note pads, note cards, invitations, and more. I love this stuff!


Beautifully crafted wodden rings by MnM Woodworks


In men's and women's sizes and designs, these rings are simply stunning.
All are custom made to your size and specs.

This is just a sampling of the wonderful items you can find at Etsy. Please, check out the site. I promise you'll be bowled over by the quality and diversity of items made by artists and artisans of all kinds.

**************************************

Uncommon Goods
Not as diverse and personal as Etsy, although some artists sell work through both places, Uncommon Goods has been a go-to gift destination of mine for years. They have gifts at all price points and lots of fun and often beautiful items.

**************************************

Klutz
For all the kids in your life, Klutz is FULL of interactive games and activities for all ages. Science kits, paper dolls, jewelry making — Klutz offers a delightful alternative to the boring, generic toys you find most places.

**************************************

What about you? Where do you like to find unique gifts?


All photos are from the seller's etsy shop.

Sunday, November 22, 2009

BBA Challenge Bread #23—Pane Siciliano

PaneSiciliano-baked-detail
Yay! Another fun bread shape—Pane Siciliano, a three day, enriched bread made with half bread flour and half semolina flour, a bit of olive oil and a touch of honey. It's as good as it sounds!

I'm baking my way through Peter Reinhart's award winning book, The Bread Baker's Apprentice, along with 200+ other amateur bakers. Want to join in the madness, or just learn more about this semi-crazy undertaking? Check out the following links:

Yep, this is a three-day bread. It can be a two-day bread if you choose to bake the same day as shaping, but PR tells us that the overnight stay in the fridge add so much to the taste that it's worth the wait.

Here's a look at the process:
PaneSiciliano-1 start
No pics of Day One. This is the middle of Day Two. Day One is mixing up pate fermentée, a pre-ferment of all-pourpose and bread flours, yeast, salt and water. It hangs out in the fridge overnight. Day Two combines the pate fermentée with more bread flour, semolina flour, salt, yeast, some olive oil, a touch of honey and lukewarm water. That ferments for about 2 hours until doubled. Next comes shaping.

PaneSiciliano-2 divide
First, divide the dough into three equal pieces.

PaneSiciliano-3 baguette
Each piece is shaped into a 24-inch baguette.

PaneSiciliano-5 rolling more
Then rolled in opposite directions from both ends, meeting at the center.

PaneSiciliano-6 shaped

PaneSiciliano-7 2 on pan

While I was shaping these, I realized that I must have made the dough too slack. That or I let it rise too long on the ferment. It didn't want to hold the baguette shape and kind of mushed together when I rolled it instead of looking like a rope. But there wasn't anything I could do about it then, so I just kept going. I knew all 3 wouldn't fit on one pan, so the third went on it's own. Practice didn't make perfect, but it did help, since the third loaf looked a lot better than the first two.

PaneSiciliano-8 final shaped
PaneSiciliano-9 final seeded
The loaves are misted with water, sprinkled with sesame seeds, then covered and put in the fridge overnight.

PaneSiciliano-10 2 proofed
PaneSiciliano-11 final proofed

I baked this almost a month ago, so I'm having a hard time remember the whole time-line, but I do know that I shaped these on Sunday evening, knowing I wouldn't get to bake them until the following evening. So after 24 hours, they got pretty big!

PaneSiciliano-12 done
These "hearth bake" which usually means me setting off the smoke alarm. Fortunately I had the presence of mind to set up a fan before the smoke had a chance to make it to the alarm, so they baked alarm free and hit the requisite internal temperature after about 30 minutes.

The parchment paper box says it's oven safe up to 420°F. Uhhh, it's acutally good until about 500°F, thank goodness!
PaneSiciliano-parchment
The semolina flour used to dust the parchment turned to charcoal!

PaneSiciliano-baked-all3
Aren't they pretty! I love this shape, and they seemed to hold up nicely, despite the imperfect shaping and extra long refrigerator stay.

One of the things I was really happy with was the lovely crust. In the intro to the recipe, PR mentions the "beautiful blistered crust" and I was thrilled to see that on mine.
PaneSiciliano-blisters

And the crumb was great. Not quite what is shown in the book, but still nice!
PaneSiciliano-crumb

And the most important thing — it tasted wonderful. The semolina flour was a nice change of taste and texture. Soft without being gummy, flavorful crust that didn't turn tough or rock hard. A lovely looking bread that delivers on taste. A win-win.


p.s. The crumb shot was taken as the sun was almost completely set. The focus assist light on my camera had a heck of a time, but I wanted to used natural light, as little as there was. And this was pre-daylight savings. Thank goodness for tripods, RAW format and Photoshop. I think the exposure was about 5 seconds!

Saturday, November 21, 2009

Patience

Mine is being tested. By a container of flour and water that isn't cooperating.

About two weeks ago, I finally started my sourdough starter. I need one for the BBA Challenge. There is an entire section of the book devoted to sourdough recipes and it's quickly approaching. I've been dreading this whole section and process from the very beginning for a couple of reasons, the first being that I don't particularly care for sourdough bread. Go ahead. Mock me. Jeer at me for calling myself a bread baker and not liking sourdough. I can take it. So having to mess with a starter is like rubbing salt in a wound and probably why I'm even more grumpy about the fact that it doesn't seem to be working quite right.

There are plenty of tutorials on "how to start your starter" and I followed a really good one from Paul at Yumarama. He went into great detail, with step by step, day by day instructions for the first week of getting a starter started. And it seemed to be going swimmingly. But for the last 4 or so days, my starter has been seriously trying my patience and adding to the resentment I'm harboring about "having" to make sourdough bread.

"But making a starter is so easy!" You know what's easy? Taking a teaspoon or so of the SAF instant yeast out of the container in my fridge and mixing it with the rest of my bread ingredients, that's what. BAM. Done. No futzing around with building up a starter, feeding it the right amounts so you have enough for the recipe and enough left over. No schedules, no wondering if it's going to work. That dry, granulated yeast hasn't let me down yet, by golly. Its needs are simple and it makes no demands of me. We're pals. But that container on my counter? Traditionally, people name their starters and after the last few days, I've settled on mine. I've decided to call it "Tim". Why? Well, my boss's name is Tim and like my boss, my starter is a pain in my ass.*

I know, I'm such a whiner. I totally own up to that. I'm practically stomping around with my bottom lip sticking out, saying, "Buhhuhuht I don't WANNA start a starter." *foot stomp*

This is why I don't have kids. I'm petulant enough—I don't need the competition. And let me tell you, the patience thing? Yeah, I'm not good at that, either. So I'm TRYING to get past the annoying toddler stage of this whole thing, both my attitude and the infancy of the starter itself, and just look at it for what it is: a learning experience.

So I guess I'll put on my big girl pants *sigh* and muster the patience to get my starter through its growing pains — or NOT growing pains, as is the case right now. And if someone wants to fill me in on why my starter reeks of a chemical, nail polish remover kind of smell, I'm all ears. I've Googled the bejeezus out of it and it seems like it's a feeding issue, but I've been feeding the damn thing twice a day.

Wish me luck—and lots of patience!


*Don't worry, my boss would laugh if I told him. He's got a sense of humor and gives as good as he gets.

Sunday, November 15, 2009

BBA Challenge Bread #22—Pain de Campagne

PdC epi closeup

I'm almost caught up with my BBA baking; now I'm working on catching up with documenting my efforts. Here's bread #22, Pain de Campagne, which I made 4 weeks ago. It'll be interesting to see how much I can remember. Let's find out...

I'm baking my way through Peter Reinhart's award winning book, The Bread Baker's Apprentice, along with 200+ other amateur bakers. Want to join in the madness, or just learn more about this semi-crazy undertaking? Check out the following links:

According to Mr. Reinhart, Pain de Campagne "is the perfect dough for creative shaping." That sounded promising to me. I do like to get creative with bread dough. I decided to try the epi for part of the dough because it's such a distinct and lovely shape, but debated about what to do with the rest.


PdC-2 ready to split
PdC-3 epi

I split the dough roughly in half, shaped one half into a baguette - badly - and set it aside to proof. The signature shape is created after the dough has proofed and is ready to bake. It was during the shaping of this first hunk of dough that I thought it might be a bit slack. From what I remembered seeing of other baker's breads, mine seemed too wet. It was too late to do anything about it but soldier on.

For the second half of dough, I decided to go seasonal and make pumpkins. I kind of meant to make them small and roll-like, but they were on the big side. They worked great for dinner, though. Just about the right amount for Dwight and myself.

PdC-4 shaping collage


Back to the epi. It's snipping time!
PdC-5 epi proofed

The dough proofed nicely but spread out a bit more than I would have liked. I think the slackness of the dough and my poor baguette shaping skills are to blame. If I'd gotten good surface tension on the dough, it would have proofed UP more, not mainly OUT. Once I got the hang of it, the snipping part was a lot of fun

PdC-6 epi cut
PdC-7 epi shaped


To the oven!

As with the other rustic breads, Pain de Campagne uses the "hearth baking" method which should produce a nice, browned crust. I was disappoined with the pale color of mine. I would have left them in a bit longer, but the bottoms were starting to burn.


PdC-bottoms
PdC-epi

So, what did I think of this one? It was good, but not great. I was disappointed with the look of it for one. I was hoping for a nice, deep color like I had with the Pain a l'Ancienne. Although I need to work on it, I much preferred the Pain a l'Ancienne and will make that again. This one, though. Probably not. It wasn't a standout and there are many others that have been.


Check out these other BBA bakers for superior results:
Daniel at Ährelich Gesagt
Mags at The Other Side of 50
Paul at Yumarama
Cindy at Salt and Serenity
Related Posts Plugin for WordPress, Blogger...